Wednesday, 23 August 2017

Down in the Coal Mine


  As we were in Truro for the Maritime Mega 4 events we took in many of the satellite events that were planned in the area. This trip was not an actual geocaching event but was an activity on the way to an event in Joggins.


  One of the organizers was able to get a trip down into the coal mine at the Springhill Miners Museum for a group of people. This tour was a great experience for me as I had been down in the mine many years earlier with family, probably around 1973, just shortly after the mine opened as museum.  The Springhill Miners Museum comprises a portion of the mine and several buildings to represent a portion of the daily life of miners at the time of the "bump" that occurred October 23 1958.  A bump is an underground earthquake caused when the galleries where coal was excavated collapse. The coal is removed and most of the stone on either side is shale or slate which is fragile and can come crashing down with no notice.


   We arrived at the mine site to begin our tour and wandered the grounds seeing the machinery and exhibits as we waited for all of our party to arrive. We took a walk through the miners museum building and it gave a brief insight into the, people and the mine as it existed at the time. The #2 Colliery was one of the deepest of its kind in the world with a sloped shaft reaching 4300m(14.200ft) in length with side cuts and galleries where the miners worked being over 1200m(4000ft) underground.

 
  We paid our admission and were given a numbered tag and headed to the change house where the significance of the tag was explained.  Each miner had their own brass tag with a unique number on it. It was used to assign gear, to tally coal mined, to receive a pay stub and most importantly to track who may still be in the mine at the end of a shift or in the case of a disaster.


  Each miner changed out of their street clothes and hung them near the ceiling in the change house. They then headed to the outfitter who have them a numbered lamp that corresponded to the number on their tag. The tag was then hung on a hook to be retrieved when they came out of the mine at the end of the shift and turned in their headlamp to be recharged for the next day.

After we were outfitted with hardhats, it was time to head to the mine shaft itself. We walked to the mine head and started down the sloping entrance to the mine. A walk that many a miner had undertaken before us. It is only as you get in the mine shaft that you realize how low the ceilings actually were. The coal seam was only about 4 feet high, so that is the amount of material that was removed, most miners worked on hands and knees as the mine owners didn't expend extra cost to make the mine higher for no added revenue from coal. Since I am 6' 4" tall the mine was a bit crowded and I did a lot of head bumping. The only consolation for me was that there was someone 6'9" tall behind me and he had it worse.


  We continued on our way down, a walk of about 300 feet that took us to a level about 80 feet underground. Here we tried to get comfortable as our guide explained about the structure of the mine and how the mining was done. The mine is flooded past this level, so we could go no further. The lights were turned out just after we were warned again about the rats in the mine. The rats were a constant companion to the miners and were a nuisance as they would steal water and food, but they also were an early warning system in the mines as they would notice trouble often before the miners would. If the rats started to run out of the mine, it was a good bet that the miners woudl be following them. We stood briefly in a dark that was absolute, so dark that there was no reference points for balance. We were told that after only a few hours in this complete darkness, trapped miners would be unable to stand because of the disorientation.


The lights were turned back on and it was time for the climb up the slope to the surface. We turned on our gear and retrieved our numbered tags. We then returned to the museum where the attendant would look up your number and tell you of the fate of the miner who held that number on the fateful day of the bump. Mine was 40 years old, with 3 children and he died in the mine, one of 75 who lost their lives that day. It was truly a somber experience to learn of the fate of so many who only wanted to provide for their families.Many who survived owed their lives to the Dragermen, who wore air tanks and would head into the mine as everyone else was trying to escape, to try and save their fellow miners. Due to their work 99 of the 174 miners underground were rescued. It took 5 and a half days to reach the last of the survivors. After that it was a recovery mission,

Monday, 21 August 2017

Tidal Bore Rafting

  It had been a couple of weeks since I did any writing on the blog. for part of the time we were away enjoying the festivities of the Maritime Mega 4 geocaching event in Truro, NS. It was an awesome time to meet geocachers from around the world and to experience our own province like a tourist. The MM4 committee organized many satellite events around the province and one of the ones that we most looked forward to was Tidal Bore Rafting. I have a confession to make, I am from Nova Scotia and have never experienced the tidal bore. Not once in over a half century of conscious memory. Whew, that is behind me. We thought that there could be no better way to experience it than to take a full immersion experience, and that truly describes what happens when you hit the river and meet the bore.

 We started the day by meeting with the organizers of this event. We seemed to have to sign an awful lot of waivers before we were allowed to go to the next step.
  You only live once right. Now, everyone is given a coloured rubber bracelet, this tells you which boat you are in, each boat holds 8 people. We looked around to find the souls with similar coloured bracelets and we had ourselves a crew.


  Next stop on the journey was the donated show pile, where shoes that were deemed too dirty to make the return trip home ended up. If you are worried about your shoes, it you wonder if the mud will come out, visit the show pile. The mud won't come out.   Next is the PFD Pile. We head there to get a flotation device that fits and get yourself strapped in.  Now properly shod and buoyant it is time to start the parade to the river bank to start the most exciting part of the day.

The donated shoes.

Getting bouyant
The start of the parade to the water

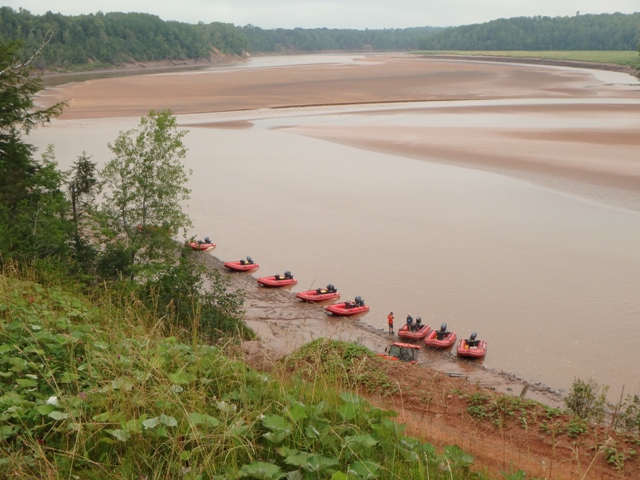
As we hike from the lodge we get our first sight of the river and our conveyance for the day, and the mud. Lots of mud. Red mud, slippery mud, did I mention lots of mud.  There is no use being dainty and trying to get to the boat without getting any on you, it won't work and you will be coated soon anyway. Best to just just grab hold of your inner child and slip, slide and roll your way to your boat.


The look of things to come


After a brief mutiny when the captain was put over the side, a new caption was at the helm.
  Now we embark on our boats and push off from shore. We head down the river for our meeting with the bore. It is amazing how shallow the river is at low tide and at several points people had to pile out to drag the boat over the bars to get to deeper water, the river changes day by day so there is no map for the bars. 


 Back in the boats once more we are motoring along watching the eagles perched in trees waiting for the inrushing tide to deliver supper, I think we are too big to tackle so are safe for the time being.  The driver takes us to a sand bar in the middle of the river where we can debark for a little while and stretch our legs as we wait for the bore to arrive.


On the bar, in a few minutes this was the rapids

  Some people use the time to get up to some mischief.  Our guide is heard to mutter that it is never the children who end up throwing mud.
Incoming!


  As we look down the river we see a faint line of light coloured foam on a chocolate milk coloured river. The bore is coming. No need to panic but it is time to get back in the boats for the highlight of the day. We move a bit further down the river and meet the bore head on. If that sounds dramatic, it is.

   It is up and over the face of the bore with the full force of the motors behind us and then into the calmer water behind it. An amazing ride, but it is not over yet. The boat disappears under the waves and fills with water. The driver gooses the throttle and pushes us into the next wave, now the water is up to your neck and another wave is looming. The water crashes over your head and the boat is nowhere to be seen, you can feel it under you, but you can't see it.
   The boat is now into the calm water and runs out the holes in the transom  and you are once again in a boat and not riding atop a submarine. You look around and see 7 more smiles that look like the one you feel on your own face. You then look around to see what the spectacle looks like from the outside as others plow through the waves.
 You think to yourself you are so glad that you did this and it was an amazing experience. But it is not over. You are in a brief reprieve as the boat is navigated around to plow through the waves once more. This time you know what is coming. The anticipation is a bit more acute. You grip the rope a bit tighter. As the waves this time seem a bit bigger and the boat plows into them a bit harder, you are sure you are going to leave the boat, not by choice, but by force. Just as you are sure that you are going overboard, another huge wave slams into you pushing you into the center of the boat. A huge grin spreads across you  face and the next wave enters your mouth, you then realize that the chocolate milk river is quite salty.
After a couple of passes through the waves it is time to head upriver to the mud banks for the final experience of the day. We exit the boat near the riverbank, removing our shoes we make out way to the top of the bank, by digging our fingers and toes into the slippery mud. We get to the top and trying to remain upright we survey the slope, then you sit/slip/fall onto the bank and shoot down the side like an otter in a wildlife show. Then it is the precarious scramble to get to the top for another slide.


Then we get the signal from our guide that it is time to head back to the lodge. We are a bit disappointed to be leaving so soon, but we are advised on the way back that the showers are communal and the first ones back get to see less of their fellow rafters. We are sold on the idea and head for the lodge. There is only one last muddy climb up the bank to shore and  a chance to hit the showers and get mud out of every nook and cranny.
After the showers are done and the muddy gear is stowed, or tossed, it is time to do a final meet up with the organizers to say thanks and to draw names for door prizes. It is a geocaching event as well.  After all is said and done we line up for a group photos to remember the fun with and it is off to the next event in our weekend.

Sunday, 30 July 2017

Blueberry Grunt

  The name Blueberry Grunt may sound a little odd to those not from the Maritimes. The name actually comes from the sound that the dish makes while cooking. It is a dish of blueberries with a batter topping. As the dish is cooked, the stewing berries release steam that bubbles up through the cooking batter with a grunting sound, hence the name. For many of us the name has been shortened to just be "Grunt". At the season when blueberries are ripening, many a meal is ended with a "Grunt".
  We have never tried this meal with other berries, but I don't see any reason why it would not work with any high liquid berries. We may have to try a Blackberry Grunt when the berries are ripe in a couple of weeks.
  A Grunt can be made in two ways, baked in the oven or on top of the stove in a covered pot. This recipe is for the oven baked variety. To cook on the stove takes a different batter and cooking method and in my opinion makes a different dish.

Here is the oven baked recipe.


 Recipe
4 cups fresh blueberries(can use frozen)
1 cup white sugar
1/2 tsp cinnamon
1/4 tsp nutmeg

batter
1 1/2 cup flour
2 tsp baking powder
pinch salt
1/2 cup white sugar
2 Tbsp chilled butter
1 cup buttermilk
1 egg

Directions
preheat oven to 350F
Place Blueberries in a greased 9x11 casserole dish
Sprinkle with the sugar and spices

Mix Flour, baking powder, salt and sugar in a bowl.
Cut in butter
Beat egg with buttermilk and stir into dry ingredients just until moist.
Dollop the batter over the berries and sprinkle the top with a bit of sugar.
Bake for 30-50 minutes until toothpick comes out of topping clean.
Serve with whipped cream or ice cream.
Blueberry Grunt hot out of the oven with whipped cream

This is truly a dish best enjoyed hot out of the oven with the whipped cream or ice cream melting over it. It also makes a great breakfast cold the next morning and will fuel you for the day with good nutrients. Plus it so much fun to tell your friends or coworkers that you had a "Grunt" for breakfast. 

  We hope that you enjoy the recipe and it inspires you to try some of the old family heirloom recipes that are kicking around in cookbooks that are handed down through the generations. Many of these old recipes are simple and tasty and come from a time when a myriad ingredients were not available. They were quick and cheap to produce.

Friday, 28 July 2017

Cranberry Scones

  When I started to write this post, I stopped to look at what a scone really is. We here on the South Shore of Nova Scotia have a varied and intermixed history with the French, British, Scottish, German and Aboriginal backgrounds that we share and are a mixture of. When I first had a scone, I thought this is just a fancy Tea Biscuit. It is similar to a Tea Biscuit and I guess similar to Bannock from the Scottish Background. Once I looked it up on-line I was satisfied that what we make is in actuality a scone.

  We love the Cranberry Scones and find them fairly quick to make if you are in a hurry and they are soooooo good hot from the oven slathered with butter.

Ingredients

3/4 cup Craisins(dried cranberries)
1/4 cup boiling water
1 3/4 cup flour
1/3 cup sugar
1/4 cup yellow corn meal
2 tsp baking powder
1/4 tsp salt
2 Tbsp chilled butter
2 Tbsp shortening
1/3 cup plain Low Fat yogourt
1/4 cup evaporated milk
1 tsp vanilla

1 large egg white
2 tsp sugar

Directions
  Combine craisins and boiling water in a bowl and cover, let stand 10 min or until softened. Drain and set aside.
  Preheat oven to 400F
  Lightly spoon flour into dry measuring cup, level with a knife.
  Add flour, sugar, corn meal, baking powder and salt in a large bowl
  Cut in butter and shortening until it resembles coarse meal.
  Combine craisins, yogourt, milk and vanilla.
  Add wet ingredients to dry mixture, mixing just until moistened
  Turn out on a lightly floured surface and knead lightly 4 times. DO NOT OVER HANDLE THE DOUGH OR THEY WILL NOT RISE UP AND BE FLAKY
  Pat dough into a 4"x8" rectangle and cut into 2"x2" squares (8 scones)
  Place on a cookie sheet lined with parchment paper
  Brush with beaten egg white and sprinkle with sugar
  Bake at 400F for 12-15 minutes


The scones can be eaten hot from the oven lathered in butter, my favourite way.  They also make a great treat to pack and take on a picnic if you are travelling.
We often have sliced cheese and fruit on the side to have a balanced meal. However you have them they are delicious and fairly quick. When we are running on a hectic schedule we find that these can be whipped up in nearly the same amount of time as a fast food meal can take at rush hour. And it is real food.

We hope you enjoy the recipe.

Monday, 24 July 2017

Falafel Sandwiches

 A falafel is probably a relatively new idea to many people, but is a staple in Middle Eastern and Mediterranean cuisine. It is a ball made of Chickpeas and spices that is deep fried. It is used as a garnish for plates and as the base for a sandwich, which is what I am going to explore today.

      
Falafel Sandwich, Tabouleh and Greek Potatoes


   There are a number of great recipes for falafels, and they are not hard to make,  but for simplicity today we used packaged falafels that we bought at the grocery store, they are good, but not nearly as good as homemade.  Traditional Falafel Sandwich is made on a Lebanese Pita Bread, but we like ours on a Greek pita or a Naan Bread which we wrote about making a while ago. If anyone wants a recipe for falafel we can write another post with it.

The big secret to a Falafel Sandwich is the Tahini Sauce which is a Sesame Sauce. The paste is much like a natural Peanut butter in that the oil floats on top and needs to be mixed in to use it.

Tahini Sauce

1/2 cup Tahini(Sesame Paste)
3 cloves garlic
1/2 tsp salt
2 Tbsp Olive Oil
1/4 cup Lemon Juice
1 tsp finely chopped parsley(optional)


Directions

  Mince the garlic and mash it with the salt. A mortar and pestle works great but the back of a spoon against the bottom of a bowl works as well.
Add Tahini and Olive Oil and mix well with the garlic.
Add lemon Juice( one good sized lemon should give enough juice)
Don't panic here as the sauce seems to harden, the sauce will turn to a fairly dry consistency.
Add water to the mixture a little bit at a time, you want to thin it enough that it will pour off a spoon.
Add parsley and mix well.
                              
Garnish

  Diced Tomato, Onion, Sweet Pepper and Cucumber. Some Hot Peppers and coarsely chopped parsley.


  Now to put together your sandwich.
  Warm your Pita or Naan and place on a plate. Put 4 or 5 falafels in a line in the middle of the bread and mash slightly with your thumb. Alongside the falafels place rows of the vegetable garnish. Sprinkle chopped parsley over the whole thing and pour some Tahini Sauce over everything.  Fold up your sandwich and enjoy.
  You can enjoy the sandwich by itself, it is a very filling meal or you can make a Taboulleh Salad or Greek potatoes to go with it. This is a very tasty meal and the first time we had tried it was at a dinner invitation from a gentleman from Lebanon. He told us at the time that it is traditional to have a glass of cola with the sandwich and for some reason it always tastes better that way.
  If you think this is too much work to find out if you like it, try one of the Lebanese restaurants that are starting to spring up, you can get a sandwich or a plate and give it a try before you decide to buy all the ingredients. We love this meal and hope you will too.


Monday, 17 July 2017

Rhize of the Rhizomes

  OK, I know that not all mushrooms have a rhizome. But the title rolled off the tongue better than "Rise of the Mycellium" or any of the other options. And it is the title that might be the first thing to grab your attention. Kind of like the colour of the fungi in the woods are the first thing that you notice.

  The other day we went for our morning walk and almost as soon as we entered the forested track we started to notice the number of mushrooms blooming. This was shortly after the latest rain and it seems the added moisture gave the fungi community a real lift.

  We were really boggled by the number of mushrooms that we saw as we stopped to look. The variety was truly amazing. The more we looked the more we discovered, they were everywhere. Some were so tiny that you had to watch where you put your feet to avoid crushing them.
Your eye would be captured by a large yellow or red mushroom and as you looked at that you would notice a tiny, white, brown, yellow or red one peeking their heads up out of the moss or leaf mould. It was truly amazing to see so many types in such a small area.

   I truly have no idea if any of them are edible and don't honestly trust myself to read a book and feel comfortable trying a foraged mushroom. I read one time that the leading cause of death among mushroom experts was mushroom poisoning. So with my luck, I decided to give this learning experience a pass. I will stick to snapping photos and tempting the visual palette rather than the culinary palette on this topic.
   As we walk through the woods on the warm days of summer when the wildflowers are waning and colour seems to be a little harder to find. Head into the shade of an old growth forest. The shade is cooling and as you look around your feet you may start to see the colours that nature has placed in one of the more unlikely spots.
   As you look at them, see the one that caught your eye, then look around to see what you might have missed if you hadn't stopped to take a look. I  bet that there are a few more there waiting to be discovered.
   They come in all shapes and sizes, on the ground, on rocks on trees both dead and alive.
It may add a bit of time to your walk but by the time you have finished you may realize that you went further than you had planned and you are not nearly as tired as you expected to be. The frequent stops let you stay in your comfort zone for a longer period of time and being in the woods, with its quiet and relaxation may have made you much more relaxed than when you started. So get out and see what might literally be right under your feet.